This is a Sponsored post written by me on behalf of Netflix. All opinions are 100% mine.
When I became a wife and mother, I committed to cooking wholesome food for my family. The downside is the amount of time I spend in the kitchen. Not just the cooking…the dishes. Oh my, the dishes! So many pots and pans to wash, all the time, and of course it's my least favorite household chore.
Netflix has come to my rescue. Over the last year, I've started watching movies and my favorite TV shows from Netflix on my iPad in the kitchen. It makes dishwashing, mixing, basting, chopping, etc. a lot easier for me. My mind is on what I'm watching instead of the drudgery at hand.
It's not just my iPad; Hubby and I will stream Netflix on our living room TV, and then fold clothes or tidy up while a favorite movie is playing. Fussy toddler at a restaurant? Netflix can restore my sanity while we're waiting on our food. Yes, this brand really has made my life easier!
This Thanksgiving will be no exception. Hubby is at Navy training, but Baby J and I will be flying to my parents' in Minnesota for the Thanksgiving holidays. I'm looking forward to showing my mom some of my favorite movies and shows that I've come across while we're working hard in the kitchen.
One of my favorite TV shows of all time is "The Killing," and all three seasons are on Netflix. I was devastated when the last season ended abruptly, until I found out that Netflix is picking up the series! The Killing is a crime drama, but it's not your typical cop show. The detectives in this show look "normal," not like they've stepped out of a modeling shoot. And they don't solve one murder in an hour. In fact, the first two seasons are regarding just one case. It's also not a very gory show, and the acting is superb.
I've also gotten hooked on "Lost," "Haven," and "Revenge." I just found out Sharknado is on Netflix, so I'm looking forward to watching that. Netflix has new movies like The Host, Assault on Wall Street, and Dead Man Down, but I really enjoy some of the older, more classic movies like The Hunt for Red October andThe African Queen. Okay, those two aren't quite in the same category, but they're both good, older films!
Over the next few weeks, we'll be making the rounds through all the Christmas movies, but before that, we'll watch Charlie Brown's The Mayflower Voyagers as a family. It's a fun, educational movie that teachers about the first Thanksgiving.
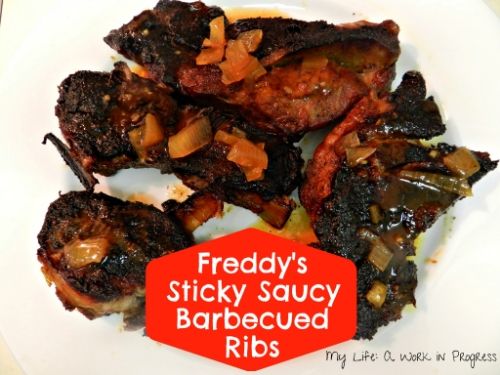
Australian celebrity chef Curtis Stone has created a barbecued ribs recipe for Netflix based off the show "House of Cards."
According to Curtis, Every time I’m watching “House of Cards” on Netflix, I want to taste those ribs that Frank eats from Freddy’s BBQ Joint. Now we all can sink our teeth into those sticky saucy ribs right along with Frank! These ribs are served with a barbecue sauce more like the one you’ll find in North Carolina (where Frank is from originally) – one with plenty of vinegar, mustard, and a touch of heat. I’ve included two cooking methods for you to try – the original true barbecue method where the ribs are slowly smoked in the barbecue, and the quicker oven-baked version – both are finger lickin’ good!
I tried this recipe yesterday, and it is really, really good! The recipe looked a little involved to me at first, so I was intimidated, but it's really not at all. Here's the recipe:
Freddy's Sticky Saucy Barbecued Ribs
Serves: 8
Prep Time: 5 hours (includes marinating time)
Cook Time: 4 1/2 hours (for barbecued ribs) or 2 1/2 hours (for oven-baked ribs)
Make-Ahead: The barbecue sauce can be made up to 2 weeks ahead, cooled, covered, and
refrigerated; reheat before using.
Ingredients-
Spice Rub:
-
1/4 cup packed light brown sugar
-
3 tablespoons sweet paprika
-
2 teaspoons freshly ground black pepper
-
2 teaspoons kosher salt
-
1/2 teaspoon cayenne pepper
-
1/2 teaspoon ground cumin
Barbecue Sauce:
-
2 tablespoons canola oil
-
1 yellow onion, chopped
-
3 garlic cloves, finely chopped
-
1 teaspoon smoked paprika
-
1/2 cup whiskey
-
1 1/4 cups cider vinegar
-
2 cups reduced-sodium chicken broth
-
1 1/2 cups ketchup
-
1 cup honey
-
2 tablespoons Worcestershire sauce
-
2 tablespoons yellow mustard
-
1 teaspoon kosher salt
-
1/2 teaspoon freshly ground black pepper
-
1/4 teaspoon cayenne pepper
Ribs:
-
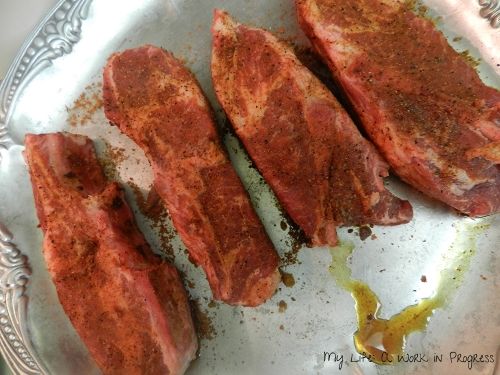
4 racks pork baby back ribs (2 1/2-pounds each) [Note: I used pork country style ribs]
-
3/4 cup cider vinegar
-
Optional Special Equipment to Barbecue the Ribs:
-
One 13 × 9-inch (or larger) disposable aluminum foil pan
-
3 cups hickory wood chips, soaked in cold water to cover for 1 hour
-
Clean spray bottle
Method-
To prepare the spice rub:
1. The day before you cook the ribs, make the spice rub. In a medium bowl, mix the brown sugar, paprika, black pepper, salt, cayenne pepper, and cumin together. Place the ribs on 2 large baking sheets and rub the ribs all over with the spice mixture. Cover and refrigerate for at least 4 hours and up to 24 hours.
Meanwhile, to make the barbecue sauce:
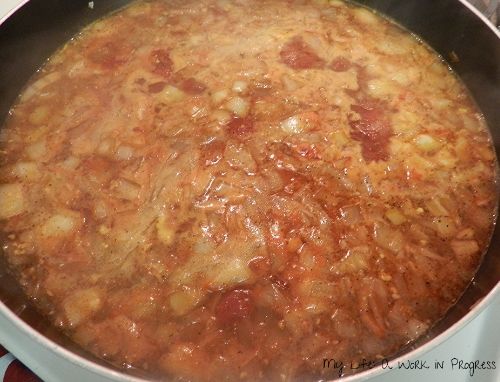
2. In a large saucepan, heat the oil over medium heat. Add the onion and cook, stirring often, for about 5 minutes, or until tender. Stir in the garlic and cook for about 3 minutes, or until the garlic is tender.
3. Stir in the paprika, then stir in the whisky and vinegar, bring just to a simmer, and simmer for 3 minutes. Stir in the broth, ketchup, honey, Worcestershire sauce, mustard, salt, black pepper, and cayenne. Bring the sauce to a simmer over high heat. Reduce the heat to medium-low and simmer uncovered, stirring often to prevent scorching, for about 30 minutes, or until the sauce reduces and thickens slightly. Remove from the heat.
To barbecue the ribs:
4. Prepare an outdoor grill for low cooking over indirect heat: For a gas grill, place the foil pan over one or two unlit burners and half-fill the pan with water. Turn on the remaining burner(s) and heat the grill to 300°F. Spread 1 cup of the drained wood chips on a piece of heavy-duty aluminum foil. Place the foil directly on the lit burner and wait until the chips are smoking before you add the ribs to the grill.
5. For a charcoal grill, place the foil pan on the charcoal grate on one side of the grill and half-fill the pan with water. Build a charcoal fire on the other side and let it burn until the coals are covered with white ash and you can hold your hand just above the cooking grate for 4 to 5 seconds. (To check the temperature more accurately, cover the grill and drop a long-stemmed metal candy thermometer through the top vent; it should register about 300°F.) Sprinkle 1 cup of the drained wood chips over the coals.
6. Combine the vinegar and 3/4 cup water in the spray bottle. Season the ribs with the salt. Place the ribs on the cooking grate over the water-filled pan. (Don’t worry if the ribs extend over the pan, as the pan will still catch the majority of the dripping juices.) Grill, with the lid closed, turning the ribs over and spraying them every 45 minutes or so with the vinegar mixture, adding another cup of drained wood chips at the same intervals, for about 3 hours, or until the meat is just tender. For a charcoal grill, you will need to add 12 ignited charcoal briquettes (or the equivalent in hardwood charcoal) to the fire along with the chips every 45 minutes to maintain the grill temperature. (Light the charcoal in a chimney starter on a fire-safe surface, or use a small portable grill or hibachi.) For either grill, do not add more wood chips after the 1 hour and 30 minute point, as too much smoke will give the ribs a bitter flavor.
7. Once the ribs are tender, begin brushing them lightly with the barbecue sauce every few minutes or so, allowing the sauce to set before applying the next coat. Continue brushing the ribs with the sauce, turning occasionally, for about 30 minutes, or until the meat has shrunk from the ends of the bones. Transfer the ribs to a carving board and let rest for 5 minutes.
Alternatively, to bake the ribs:
8. Position the racks in the center and upper third of the oven and preheat the oven to 375°F. Cover the ribs on the baking sheets with foil. Bake the ribs, rotating the baking sheets and basting the ribs after the first 45 minutes, and recovering them with foil, for 1 1/2 hours, or until the ribs are tender and the meat has shrunk from the ends of the bones.
9. Uncover the ribs, baste them with the barbecue sauce and continue baking for 10 minutes, brushing them lightly with the barbecue sauce every few minutes or so, allowing the sauce to set before applying the next coat.
To serve:
10. Using a large sharp knife, cut the racks into individual ribs. Arrange the ribs on a platter and serve with the remaining sauce on the side.
These ribs were really easy to make! I baked mine too. Since it's just Baby J and me at home right now, and the most we do for entertaining is hosting a play date, I decided to cut the portions of the original recipe. I used four pork country style ribs. I went ahead and made the full amount of spice rub and barbecue sauce, but I used less than half of each, and stored the rest away for later, so I can make this again!
The barbecue sauce has a very tart flavor. It's a sweet, vinegar reminds me of Carolina-barbecue. What's interesting is I thought the ribs would take on the tart flavor, but they didn't really. When I tasted them, they were sweet and savory. So if you like that Carolina vinegar taste, you may want to add more of the barbecue sauce on top before eating. I was really impressed with this recipe and will be making it again. I've never been a fan of ribs, because I always associated them with that heavy, messy, tomato sauce all over the top. But that is not the case with this recipe. These ribs are tasty!
To keep updated on new shows and movies being added to their library, Like Netflix on Facebook, Follow @Netflix on Twitter, and Follow Netflix on Pinterest.
If you try this recipe, please let me know how you like the ribs. Will you use Netflix in the kitchen this holiday season? Which shows or movies will you be watching?


