Campfire pizza log


It’s almost Labor Day -a busy camping weekend- so I wanted to share one of my new favorite camping meals, a campfire pizza log!

Over Memorial Day weekend, we went camping at our favorite place to travel to and camp at, Shenandoah National Park. This time we went with a co-worker of mine and his family. We decided ahead of time to share some meals, so I started researching online different yummy meals for camping. I wanted to up my game since I was cooking for people other than my family!

One meal I came across was the campfire pizza log, but I couldn’t find a site that gave step-by-step instructions. Without instructions, we had to wing it, and we definitely have some lessons learned, which I thought I’d share.

To make the pizza logs, I used:

  • Refrigerated pizza dough (the kind you roll out from a can)
  • Pizza sauce
  • Pepperoni
  • Shredded cheese
  • Olive oil spray (okay, I didn’t actually use this, but I should have, and I will next time)
  • Nonstick foil

The logs are pretty simple to prepare. I made three large pizza logs (three cans of the refrigerated pizza dough), which is what you’ll see in my photos; HOWEVER, because the larger logs didn’t cook evenly, I recommend doing smaller pizza logs, so two logs from each can. I’ve written the directions below to reflect what I will do next time.

Directions for two small pizza logs:

    1. Cut two large pieces of nonstick foil. They should be large enough that you can completely wrap up the pizza logs. It’s better to cut them too big than too small. You can always trim off the excess with some kitchen shears or scissors!
    2. Have the nonstick side facing up off the counter (you’ll want the pizza logs on the nonstick side) and spray the nonstick with an olive oil spray or something similar. This will help keep the pizza log from sticking to the foil when you unwrap it after it’s been cooked.
    3. Before rolling out the pizza dough, cut the dough log in half. You’re going to make two smallish pizza logs from each can of dough.
    4. Place each piece of dough onto its own piece of foil.
    5. Roll out the pizza dough on the foil until each piece is in a rectangle.
    6. Spread the pizza sauce on top.
    7. Layer the pepperoni and cheese. (Obviously you can use whatever toppings you want.)
    8. Roll the pizza back up into the shape of a “log.”
    9. Fold the foil over top of the log and secure all the edges by rolling them in.

Camping Food

Camping Food
I didn’t do it, but cut this in half! Make two pizza logs from this sucker.

Camping Food

Corn and Pizza Logs
The smaller rolls to the left are pieces of corn on the cob. The three long rolls on the right are the campfire pizza logs.

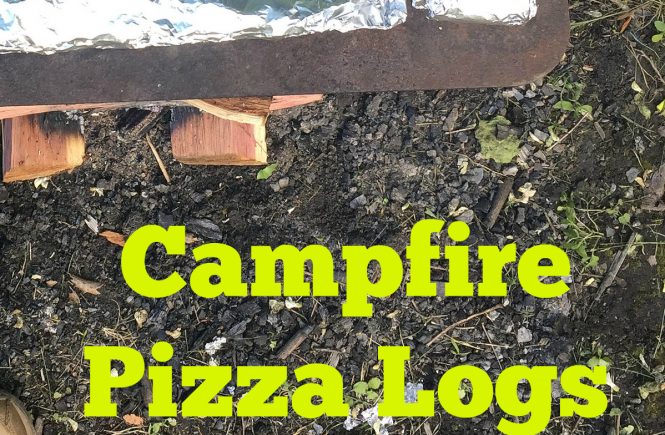
That’s it! I actually froze ours in the freezer since we didn’t intend on eating them the first day of camping. Once they were frozen, I wrapped them in plastic wrap and put them in our camping cooler with ice. I was hoping that as the ice melted, the plastic wrap would help keep any water out of the logs, and it did seem to work.

Camping Food
The two longer rolls are the pizza logs. The small and medium rolls are corn on the cob.

When it was time to cook the pizza logs, we got a nice fire going, and then we placed the pizza logs on the flat griddle above the fire. As I mentioned above, the pizza logs didn’t cook evenly. The logs were getting a nice char in the center within 20 minutes, but these larger logs that I made were so long that the edges were too far away from the fire and weren’t picking up heat. That’s why I suggest making two pizza logs from each can of refrigerated pizza dough. That will get you a more evenly cooked pizza log, and they should be done around 30 minutes.

Camping Food
You can see that the center part of the pizza log is a little more cooked and charred than the edges. That’s why I recommend making smaller logs, so the edges can also reach the fire.

The cooking time is going to vary depending on how hot your fire is and the proximity of the pizza log to the fire, so keep that in mind. You’ll want to peel back the foil about every 10 minutes to check the logs. Use tongs to help you check safely, and if you wear fabric oven mitts … keep them away from the flames!

Camping Food
So tasty inside!

The three cans of refrigerated pizza dough ended up making enough pizza logs to feed 4 adults and 3 small children with leftovers. I also served up some fire-grilled corn on the cob.

Have you ever made a pizza log? What is your favorite camping food?


Continue Reading

Review of LuLaRoe’s Julia Dress (unsponsored)

Note: I don’t sell LuLaRoe, and I paid for the dresses that I show in this post. This post does contain an affiliate link to Amazon.

I love, love, love the Julia dress from LuLaRoe. Now I typically like to spend no more than $30 on a dress, so I’ll wait for the department store sales before I go dress shopping. But the Julia –priced at $45– is worth the money, in my opinion.

Since it’s a form fitting dress, I was originally skeptical that I would like it. But the fit is so, so flattering! I did size up larger than the recommended size. In the Loft or Ann Taylor, I wear an 8 or a 10 in dresses (usually an 8). The Julia size chart recommends that I order a medium, but I already have an Ana dress in medium, and I don’t like how tight it is in the rib cage and the arms, so I ordered the Julia in a large, which is supposed to fit sizes 12-14.

What is also great about the Julia dress is that my friend who is built completely opposite than I am also loves it. Nicole is much shorter than I am, and has a very curvy but athletic figure (think hourglass), where my figure is more straight up and down (rectangle). The fact that two very differently built people both love this dress really shows how great this dress is.

The Julia is a midi-length dress, but I have two of them, and the geometric print dress is shorter than the other as you can see in the photos. At 5’10”, I prefer the longer length. My knees are not exactly my favorite part of my legs.
Julia collage

This dress is so comfortable! I’ve been wearing it to work, and I basically feel like I’m wearing a pajama t-shirt all day. Throw a complementary blazer on, and Julia looks completely professional. I’ve been unexpectedly called into a meeting with high-profile “customers” while wearing a Julia (I work for a DOD school that’s for service members, so basically our “customers” are the career field managers from all military service branches). I felt completely confident that I was dressed appropriately, and I believe I presented myself professionally. And I was so comfy doing it!

Julia
Wearing Julia at work with a teal cardigan, brown tights and brown chukka boots.

By the way, if you like my cardigan sweater in the photo above, it’s the BIADANI Women’s Crewneck Button Down Sweater on Amazon. The teal cost me $14.99, and I’m very impressed with the quality. The fabric is thick, and it’s difficult for me to find tops with long enough sleeves for me.

I love how many colors and patterns are constantly available. I’m planning on buying a couple more Julias in more casual prints or fabrics as go-to dresses for this summer. I think this dress will be perfect for the playground or walking around outdoor shops, etc.

Do you own a Julia? What do you think about it?

Continue Reading

Dyeing my hair red at home

Disclaimer: I’m going to talk about some of my recent hair dye experiences, but I’m not a professional. If you use any products I write about or follow any of the steps I took, I can’t predict your outcome, but here’s how I dyed my hair red at home:

Although it’s been several months since I’ve had red hair, I thought I’d go ahead and post about it. When I was researching dyeing my hair red at home, I couldn’t find a lot of posts that showed pictures of women with light or medium brown hair going red, which was a bit frustrating. Maybe this post will help give someone a little scope on the colors.

BACKGROUND:

I’ve dyed my hair red five times at home now. The first time was not good (I’ll explain in a minute). The second time was okay. The third time? Perfect! The fourth and fifth times were upkeep, and then I decided to go back to brown, which is what I have now.

I had been toying for months (maybe longer) about dyeing my hair red. I had a reddish-brown thing going on fall of 2014 for a couple of months before I went to brown and blonde highlights. When I was in high school, I went through a henna stage, so I knew that red was a good color on me. That wasn’t an issue. It took me a long time to go back to red because I wasn’t sure what color, and I also didn’t want to pay money at a salon. I knew that if I wasn’t going to go to a salon, I’d better know what I was doing.

Well, the first time I tried last year, I still didn’t know what I was doing. That’s because I did it kind of on a whim. I mean, yes, I’d been thinking about it for months, but the day that I went back to red was just a random day that I said, “Okay! I’m going to do it!” while I was at the store, walking by the hair dye aisle. So I didn’t really think that through. Don’t do that.

This is the brown I started with.

The instructions on the dye box said to apply the dye to my roots first and then the rest of my hair. I learned the hard way that, that was completely opposite of what I needed to do. My roots were “virgin” hair, whereas the rest of my hair had medium brown dye on it. I ended up with “hot roots,” which means they were significantly brighter than the rest of my hair. I also didn’t get the dye on evenly, so I ended up with uneven brown sections and red sections as you can see in my hair below. Not a good look.

Uneven brown and red

After that, I started buying L’Oreal’s CHROMA True Reds dye and a bottle of developer from my local Sally Beauty Supply. I also bought a little bowl with measurement markings and a extra-wide brush, and then a bunch of upkeep-type items since I’d read that red hair fades easily.

Here’s what I bought from Sally’s, and it looks like a lot (and it is), but with some sales going on, it cost me less than $50!

  • L’Oreal Technique CHROMA True Reds in 3RV CHROMA CHERRY
  • L’Oreal Technique Oreor 20 Volume Creme Developer (If you have darker hair, you’ll probably need at least 30)
  • Hair Color Mixing Bowl
  • Extra Wide Jumbo Tint Brush
  • Regular Tint Brush
  • Hair Color Mixing Whisk
  • Rattail Comb
  • Quantum Riveting Reds Color Replenishing Shampoo
  • Quantum Riveting Reds Color Replenishing Conditioner
  • Ion Moisture Miracle Leave-In Conditioner
  • SalonCare Shorty Section Clips
  • SalonCare 2 Black Reusable Gloves
  • Ion Color Intense Moisture Conditioner (2 sample packs)
  • Ion Repair Solutions Effective Care Treatment (sample pack)
  • Ion Color After-Color Sealer (sample pack)

I also went to Ulta and bought the following, which cost me about $15 (my receipts are long gone, so I’m guesstimating here).

  • Love for Hue Color Care UV Protectant Spray
  • Batiste Dry Shampoo in Blush

I treated my hair first with the intense moisture conditioner, and then I used my blow dryer to dry my hair. After that, I followed the directions on the box for the CHROMA dye and mixed it with the developer in my mixing bowl. I alternated between the two different-sized tint brushes, but I ended up using extra-wide brush the most. It just made the process go faster.

The dye started off as light pink, but the longer it sat, the darker the dye got.

I purposely put the dye on the brown sections of my hair first. I knew that those spots would need to process a little longer than the rest of my hair.

Letting dye sit on the brown spots for about 10 minutes before I moved on to the rest of my hair

I waited about ten minutes before I started dyeing the rest of my hair. I know some people put Vaseline around their hairline to keep the dye off their skin, but I didn’t bother. It was easy to take off after the fact with shampoo.

IMG_5376
Sooooo bright

I let the dye sit on the rest of my hair for about 20 minutes, and then I rinsed. Here’s the key with bright red hair dye though: don’t rinse your hair until the water is clear. You have to rinse until your the water is running pink, and that’s it. And every time you wash your hair, you’ll lose some of the dye. That’s why I would use the color replenishment shampoo and conditioner. They are a red shampoo and conditioner that add color every time I would wash my hair.

Cherry red


I loved my time with red hair, but the upkeep was a lot of work. Besides using the color replenishment shampoo and conditioner, I only washed my hair every 2-3 days. I used dry shampoo in the meantime to keep my hair looking fresh. It worked. My hair stayed very bright right up until I needed to dye my re-growth, but it was time consuming, and I went through a lot of product. I’ve since gone back to brown, and I used Color Oops to do so. I’ll write another post detailing how that went.

Have you dyed your hair red at home? How did it go?
Continue Reading