Note: I don’t sell LuLaRoe, and I paid for the dresses that I show in this post. This post does contain an affiliate link to Amazon.
I love, love, love the Julia dress from LuLaRoe. Now I typically like to spend no more than $30 on a dress, so I’ll wait for the department store sales before I go dress shopping. But the Julia –priced at $45– is worth the money, in my opinion.
Since it’s a form fitting dress, I was originally skeptical that I would like it. But the fit is so, so flattering! I did size up larger than the recommended size. In the Loft or Ann Taylor, I wear an 8 or a 10 in dresses (usually an 8). The Julia size chart recommends that I order a medium, but I already have an Ana dress in medium, and I don’t like how tight it is in the rib cage and the arms, so I ordered the Julia in a large, which is supposed to fit sizes 12-14.
What is also great about the Julia dress is that my friend who is built completely opposite than I am also loves it. Nicole is much shorter than I am, and has a very curvy but athletic figure (think hourglass), where my figure is more straight up and down (rectangle). The fact that two very differently built people both love this dress really shows how great this dress is.
The Julia is a midi-length dress, but I have two of them, and the geometric print dress is shorter than the other as you can see in the photos. At 5’10”, I prefer the longer length. My knees are not exactly my favorite part of my legs.
This dress is so comfortable! I’ve been wearing it to work, and I basically feel like I’m wearing a pajama t-shirt all day. Throw a complementary blazer on, and Julia looks completely professional. I’ve been unexpectedly called into a meeting with high-profile “customers” while wearing a Julia (I work for a DOD school that’s for service members, so basically our “customers” are the career field managers from all military service branches). I felt completely confident that I was dressed appropriately, and I believe I presented myself professionally. And I was so comfy doing it!
Wearing Julia at work with a teal cardigan, brown tights and brown chukka boots.
By the way, if you like my cardigan sweater in the photo above, it’s the BIADANI Women’s Crewneck Button Down Sweater on Amazon. The teal cost me $14.99, and I’m very impressed with the quality. The fabric is thick, and it’s difficult for me to find tops with long enough sleeves for me.
I love how many colors and patterns are constantly available. I’m planning on buying a couple more Julias in more casual prints or fabrics as go-to dresses for this summer. I think this dress will be perfect for the playground or walking around outdoor shops, etc.
Disclaimer: I’m going to talk about some of my recent hair dye experiences, but I’m not a professional. If you use any products I write about or follow any of the steps I took, I can’t predict your outcome, but here’s how I dyed my hair red at home:
Although it’s been several months since I’ve had red hair, I thought I’d go ahead and post about it. When I was researching dyeing my hair red at home, I couldn’t find a lot of posts that showed pictures of women with light or medium brown hair going red, which was a bit frustrating. Maybe this post will help give someone a little scope on the colors.
BACKGROUND:
I’ve dyed my hair red five times at home now. The first time was not good (I’ll explain in a minute). The second time was okay. The third time? Perfect! The fourth and fifth times were upkeep, and then I decided to go back to brown, which is what I have now.
I had been toying for months (maybe longer) about dyeing my hair red. I had a reddish-brown thing going on fall of 2014 for a couple of months before I went to brown and blonde highlights. When I was in high school, I went through a henna stage, so I knew that red was a good color on me. That wasn’t an issue. It took me a long time to go back to red because I wasn’t sure what color, and I also didn’t want to pay money at a salon. I knew that if I wasn’t going to go to a salon, I’d better know what I was doing.
Well, the first time I tried last year, I still didn’t know what I was doing. That’s because I did it kind of on a whim. I mean, yes, I’d been thinking about it for months, but the day that I went back to red was just a random day that I said, “Okay! I’m going to do it!” while I was at the store, walking by the hair dye aisle. So I didn’t really think that through. Don’t do that.
This is the brown I started with.
The instructions on the dye box said to apply the dye to my roots first and then the rest of my hair. I learned the hard way that, that was completely opposite of what I needed to do. My roots were “virgin” hair, whereas the rest of my hair had medium brown dye on it. I ended up with “hot roots,” which means they were significantly brighter than the rest of my hair. I also didn’t get the dye on evenly, so I ended up with uneven brown sections and red sections as you can see in my hair below. Not a good look.
Uneven brown and red
After that, I started buying L’Oreal’s CHROMA True Reds dye and a bottle of developer from my local Sally Beauty Supply. I also bought a little bowl with measurement markings and a extra-wide brush, and then a bunch of upkeep-type items since I’d read that red hair fades easily.
Here’s what I bought from Sally’s, and it looks like a lot (and it is), but with some sales going on, it cost me less than $50!
L’Oreal Technique CHROMA True Reds in 3RV CHROMA CHERRY
L’Oreal Technique Oreor 20 Volume Creme Developer (If you have darker hair, you’ll probably need at least 30)
Hair Color Mixing Bowl
Extra Wide Jumbo Tint Brush
Regular Tint Brush
Hair Color Mixing Whisk
Rattail Comb
Quantum Riveting Reds Color Replenishing Shampoo
Quantum Riveting Reds Color Replenishing Conditioner
Ion Moisture Miracle Leave-In Conditioner
SalonCare Shorty Section Clips
SalonCare 2 Black Reusable Gloves
Ion Color Intense Moisture Conditioner (2 sample packs)
Ion Repair Solutions Effective Care Treatment (sample pack)
Ion Color After-Color Sealer (sample pack)
I also went to Ulta and bought the following, which cost me about $15 (my receipts are long gone, so I’m guesstimating here).
Love for Hue Color Care UV Protectant Spray
Batiste Dry Shampoo in Blush
I treated my hair first with the intense moisture conditioner, and then I used my blow dryer to dry my hair. After that, I followed the directions on the box for the CHROMA dye and mixed it with the developer in my mixing bowl. I alternated between the two different-sized tint brushes, but I ended up using extra-wide brush the most. It just made the process go faster.
The dye started off as light pink, but the longer it sat, the darker the dye got.
I purposely put the dye on the brown sections of my hair first. I knew that those spots would need to process a little longer than the rest of my hair.
Letting dye sit on the brown spots for about 10 minutes before I moved on to the rest of my hair
I waited about ten minutes before I started dyeing the rest of my hair. I know some people put Vaseline around their hairline to keep the dye off their skin, but I didn’t bother. It was easy to take off after the fact with shampoo.
Sooooo bright
I let the dye sit on the rest of my hair for about 20 minutes, and then I rinsed. Here’s the key with bright red hair dye though: don’t rinse your hair until the water is clear. You have to rinse until your the water is running pink, and that’s it. And every time you wash your hair, you’ll lose some of the dye. That’s why I would use the color replenishment shampoo and conditioner. They are a red shampoo and conditioner that add color every time I would wash my hair.
Cherry red
I loved my time with red hair, but the upkeep was a lot of work. Besides using the color replenishment shampoo and conditioner, I only washed my hair every 2-3 days. I used dry shampoo in the meantime to keep my hair looking fresh. It worked. My hair stayed very bright right up until I needed to dye my re-growth, but it was time consuming, and I went through a lot of product. I’ve since gone back to brown, and I used Color Oops to do so. I’ll write another post detailing how that went.
Have you dyed your hair red at home? How did it go?
First, I am not a LuLaRoe consultant; I am not being compensated for this post. Next, if you’re unfamiliar with the LuLaRoe brand, I recommend you read my earlier LuLaRoe post.
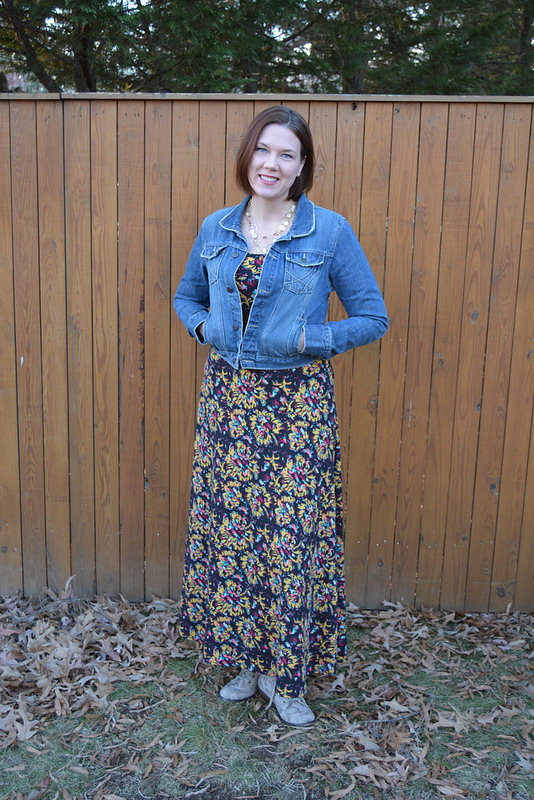
I like maxi dresses, but I hemmed and hawed for a few months before buying an Ana dress. This was partly because at $60, it’s a little pricier than I want to pay for a dress. Second, I knew it wasn’t going to be floor length on me because I saw from photos online that it’s floor length on women who are shorter than I am. But when a friend threw a Facebook LLR party, I found an Ana dress in a pattern I liked, and I finally bought one. I’m 5’10,” and my weight is usually around 160 pounds, so I generally wear a size 8 or 10 in clothes, depending on the brand. I bought the Ana in a Medium, which is supposed to fit dress sizes 8-10.
I love the pattern, and the dress fabric is very soft and comfortable. I also like the style, but I do have two concerns about the dress:
1. You may or may not be able to tell in the photo below, but it’s really tight around my ribcage and my arms. I do have a large ribcage, and my waist is not very defined compared to my ribs and hips, so if you’re a similar weight and dress size, you may not have this problem depending on your build. However, because of the tightness, I later purchased the LLR Julia dress (my favorite!!!!) in a Large.
2. I’m not thrilled about the awkward length of the dress on me. Again, I knew that was going to happen, so even before I ordered the dress, I knew it was going to have to be all about the booties. In these photos I’m wearing the dress with some casual flat booties, but I’ve worn the dress to work with black, high-heeled, ankle-length boots. The dress really shows off the boots, and I’ve received several compliments on them. I’ve tried wearing the dress with sandals and flats (shoes not boots), and it looks sooooo awkward, like I couldn’t find a dress long enough. I snapped a quick photo at work, so you can see a dressier look with this Ana:
So the bottom line is that I probably won’t buy another Ana again because they are expensive for a dress that really isn’t long enough (or short enough!) for me. I think it would fit someone around 5′ 7″ a lot better.
UPDATE: Thanks to Stacy’s comment below, I did try sizing up with a Large Ana. I still found the sleeves and ribcage a little tight, especially considering I’ve lost weight since I originally posted, but the length on the Large is just about right for me. I will post photos soon!


 2. I’m not thrilled about the awkward length of the dress on me. Again, I knew that was going to happen, so even before I ordered the dress, I knew it was going to have to be all about the booties. In these photos I’m wearing the dress with some casual flat booties, but I’ve worn the dress to work with black, high-heeled, ankle-length boots. The dress really shows off the boots, and I’ve received several compliments on them. I’ve tried wearing the dress with sandals and flats (shoes not boots), and it looks sooooo awkward, like I couldn’t find a dress long enough. I snapped a quick photo at work, so you can see a dressier look with this Ana: